
Imagine this: It's first thing Monday morning and you already have meetings to set up with six prospective clients. Plus, you know that more will be added to your list during the day, and probably throughout the rest of the week. How do you go about that? Do you email each of them, asking for their schedules and when they can fit you in? Then, you must manage their replies, going back-and-forth, making sure you've got times free in your calendar to match theirs. If not, it's more back-and-forth.
That's where SmarterMail Scheduling comes in. It works just like services such as Calendly.com and Harmonizely.com. However, whereas these services require separate sign up, add additional cost, and need to be integrated with an email account, SmarterMail's Scheduling is built in. It quickly and easily takes the pain out of making sure you and the people you need to connect with can find convenient times that fit both of your busy schedules.
How It Works
As mentioned, Scheduling is built into SmarterMail. Once a user enables it, they have the ability create meeting types, set up when they want to be available for scheduled meetings, choose the calendars they want to use for checking for conflicts, and more. Once everything is configured, a public page is created that can be sent out to people, or a link can be added to a "Schedule an Appointment" line in the SmarterMail user's signature.
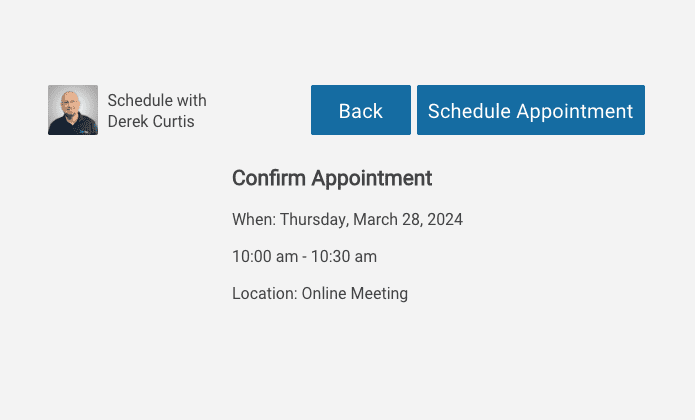
Regardless of how the public page is distributed, people can then visit the page and find a day and time that's convenient for them, as well as with the SmarterMail user. They select the day and time, enter some information, and then they save the scheduled appointment. They can even add in "Guests" they want to include, if needed. For example, someone schedules a product demo with you, and they want someone else to join as well.
Once a scheduled appointment is made, they receive an email invitation for the appointment and the SmarterMail user has it added to their calendar automatically! At that point, it becomes a regular appointment in the calendar for them both, so they can interact with it as they need: moving it, propose a new day and time, cancel it, and more.
Benefits of SmarterMail Scheduling
First, using scheduling automation is a great time saver. Without it, there is generally a lot of back-and-forth between parties, either via email or phone calls. That's because each person must look at their calendar, find a few days and times that are open, then send those over to the other party, who then must look at THEIR calendar. If the initial suggested days and times don't work, the process starts all over again. Using a Scheduling page means that at least one side shows their availability, and the other can simply find a day and time that works best.
Next is the cost savings. Since Scheduling is built into SmarterMail, there's no need to use outside services. These have become quite popular recently, and while they're nice to have, they do have a cost. Calendly paid plans START at $10/month, Harmonizely is $9.99. And while both offer free tiers, those plans are limited.
Finally, there's ease-of-use: SmarterMail Scheduling just works. It's part of SmarterMail, so there's no need to integrate it with other email accounts or calendar services. The calendars you use every day are RIGHT THERE!
Scheduling Options
Setting up Scheduling for your account is really easy.
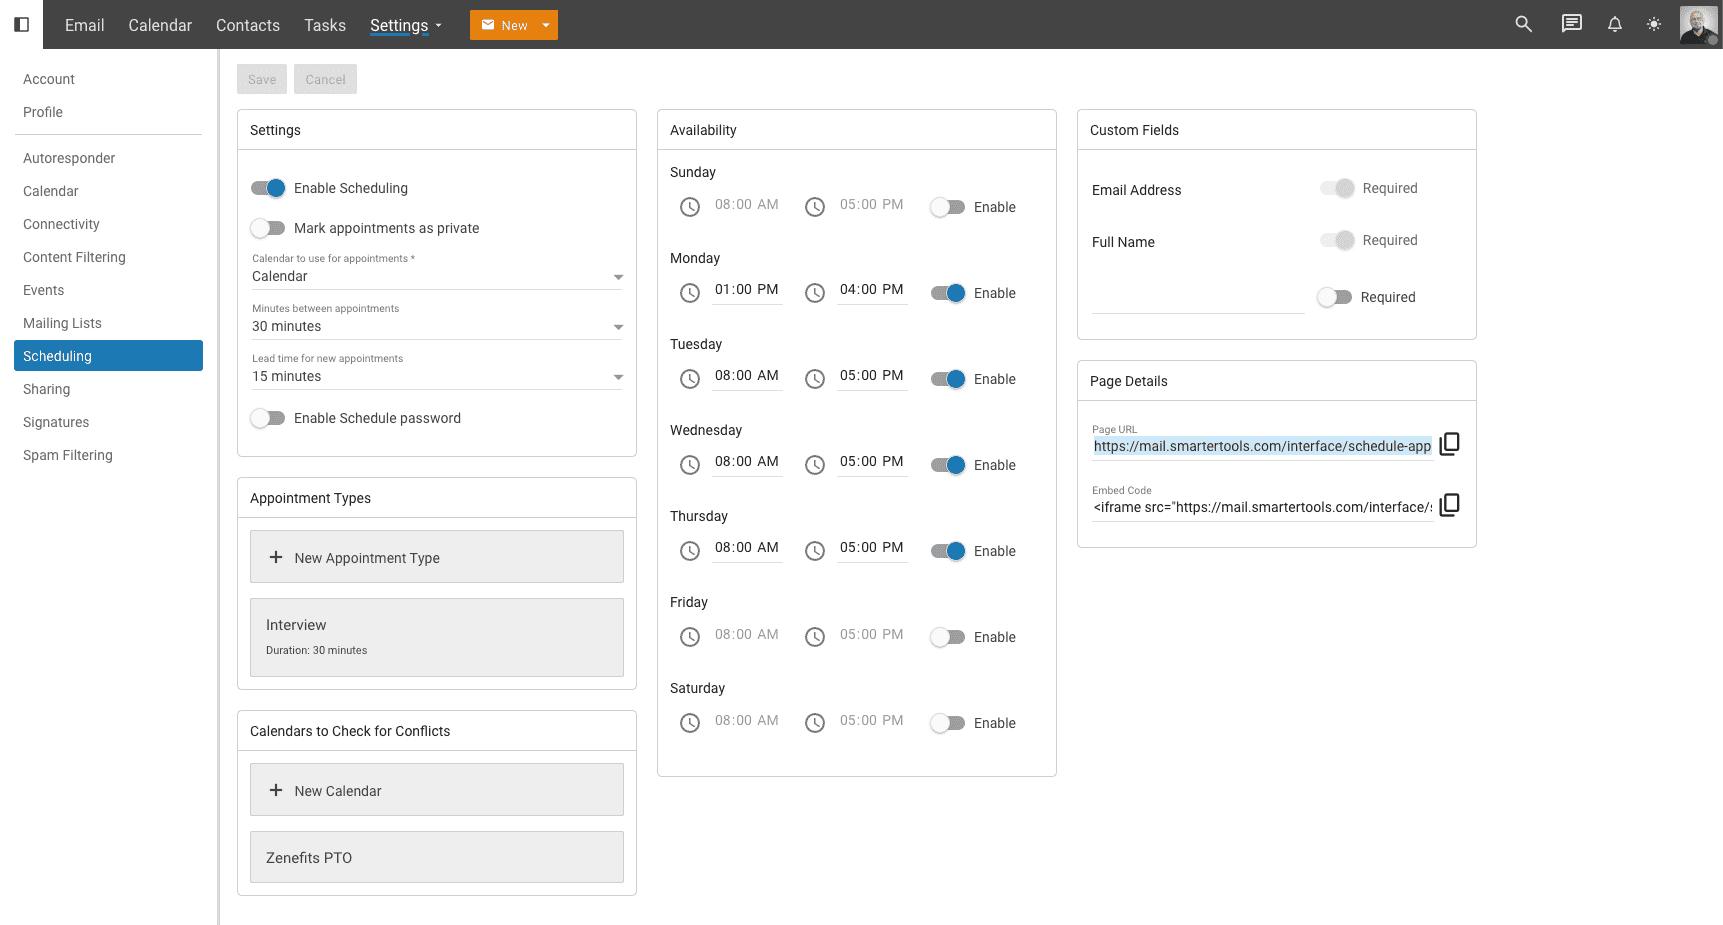
The first thing you need to do is enable it. Scheduling is available for all users, and is not something a domain administrator needs to set up. We feel users manage their own calendars, so they should manage Scheduling as well.
General Settings
The first thing you need to do is set up the basics:
- Calendar to use for appointments - This is, generally, going to be the same calendar you use for all your appointments, but you can change it if you like. By default it's set to your primary Calendar.
- Minutes between appointments – No one really wants back-to-back calendar entries. (Well, MOST people don't.) So, you can create some "breathing room" between appointments that are scheduled with you.
- Lead time for new appointments – You also don't want to send someone your scheduling link, then have them schedule an immediate appointment. So, you can set some lead time between when someone gets your link and when they can schedule their first appointment.
Appointment Types
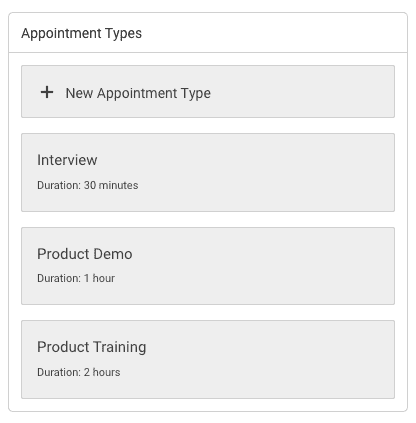
Appointment types are the reasons you're going to use Scheduling in the first place. These can be:
- Introductory Calls
- Interviews
- Demos/Walkthroughs
- Training Sessions
- Anything Else
Really, an appointment type can be anything you want it to be. You can have one appointment type, or multiple, and each appointment type can have its own duration. Best of all, Scheduling ties into other SmarterMail features. For example, if you set up an "Interview" Appointment Type, you can have those appointments automatically generate an Online Meeting URL so you can use audio and video conferencing for interviews!
Calendars to Check for Conflicts
People don't generally work in a silo, especially in larger companies. Sure, you have your primary calendar, but you may have other calendars shared with you as well. For example, a co-worker's calendar, a PTO calendar, etc. plus you may have several calendars of your own.
As a result, you want to check each of those to make sure the times that are displayed as "available" on your public Scheduling page means that those are days and times you're actually available. SmarterMail Scheduling allows you the select the various calendars on your account that you want to check for conflicts to help avoid the potential for double booking.
Availability
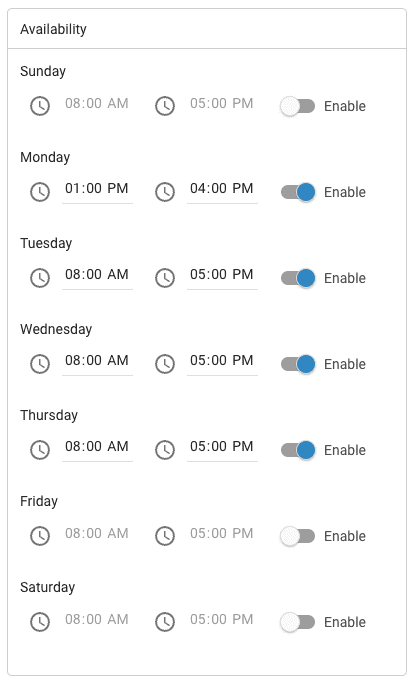
Do you like to block out time in your day for specific tasks? Say, you want to use your mornings for catching up on emails and returning phone calls, etc., and leave your afternoons open for whatever. Maybe the first couple of days of your week are busier than the last couple of days. Maybe Mondays are always "Meeting Days" and you just can't fit in any more appointments in on Mondays. (Nor do you WANT to.)
Regardless of how you like to work, SmarterMail Scheduling allows you to set your availability, showing only the days and times you want displayed on your public Scheduling page. You can set blocks of time for specific days of the week, and then only those blocks of time on those days will be open to people looking to schedule time with you.
That flexibility makes it easy to plan your days and weeks and ensures you're available when needed.
Custom Fields
Regardless of the type of appointment you set up in Scheduling, users will always be asked for their email address and full name. If you want more information than that added when someone schedules something with you, that's where Custom Fields come in handy.
Custom Fields give you the opportunity to ask questions like "How'd you hear about us?" for gauging marketing efforts. If you're offering product demos, ask for the product or service being demoed. If you want to contact phone number, add it as a Custom Field. Anything you add here, in addition to the 2 default fields, will appear on the scheduling page when someone schedules time with you, regardless of Appointment Type. Up to 5 additional fields can be added.
Page Details
Finally, there's Page Details. This is where you find the Scheduling Page URL. You'll want to copy this and send it out in emails and/or chats, or use it for adding a "Let's Schedule Time to Talk" link to your email signature.
If you want to get even more creative, use the Embed Code provided to embed the scheduling section of your public page into any website you manage. If you have a profile page on your company's website, why not embed the ability to schedule time with you right there alongside the list of your accomplishments and areas of specialization?
Getting Started
It's easy to get started using SmarterMail Scheduling. Simply log in to your SmarterMail account and go to your Settings page. Click on the Scheduling menu option, and then toggle "Enable Scheduling". All of the above items will be laid out there in the content page. Create your Appointment Types, select the appropriate Calendars, set your Availability, add in any Custom Fields, and then save your changes. The final step is to copy that Scheduling Page URL and start using it!